

This tutorial is mainly based on script suitable for Amazon Linux 2 AMI and AWS Ubuntu Server 20.04 LTS
When you launch an instance in Amazon EC2, you can pass User-data to the instance that can be used to perform automated configuration tasks or run scripts after the instance starts. This is helpful when you want your newly created instance to be in a certain state with certain packages installed, or with a certain custom configuration. Suppose you are experimenting with some commands but you don’t want to connect to SSH and type each command line by line then User-data is your solution. Using shell scripts in user-data you can install the package automatically.
In this tutorial, I am going to show you how to install WordPress without using an SSH terminal. Before beginning this tutorial I want you to know how to install WordPress using SSH terminal first. It will give you a clear explanation of each shell command line involved.
Why should you use USERDATA and when ?
If you want to host WordPress in AWS with your own dedicated virtual server but don’t want to go through all setup processes then you can use user data to automate steps for you. Whether you connect to SSH and type all the commands or use user-data, end result is the same so why not use user-data instead?
I have prepared all the scripts needed to install WordPress and experimented with EC2. I did some research on the Linux shell script and tested it against EC2 AMI. After several testing, the final script was prepared. You can download the whole script here.
What does the script do ?
This is what script does:
- Update packages and install LAMP server
- Download WordPress and extract files to var/www/html folder
- Install secure MySQL , assign root password, create database ,user and password
- Update wp-config.php with provided database value
- Enable .htaccess in Apache config httpd.conf
- Enable auto start of Apache and MySQL server
Process:
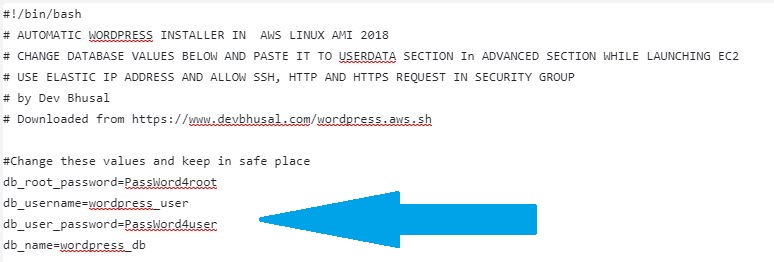
Download the script from below or copy the script which is at end of this post. Open downloaded WordPress.aws.sh file in a text editor. If you want to install WordPress with default database settings then you don`t have to do any edits on text. But If you want to use your own database settings then edit database values in the text editor. After editing the text, copy the whole text to the clipboard.
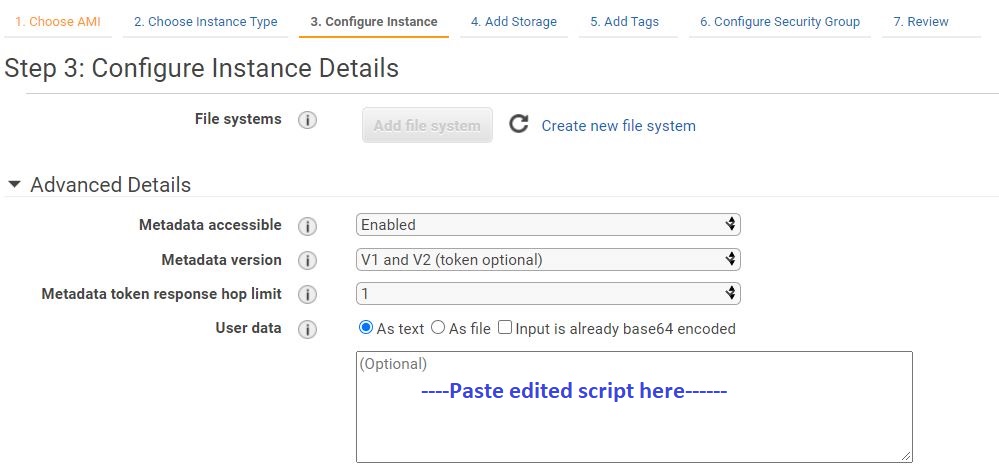
You dont need to change anything else. Keep edited script in a safe place and start launching a new EC2 server. Select Linux 2 AMI. In Step 3: Configure Instance Details, go to the Advanced details section and Paste the edited Script into User data.
In Step 6: Configure Security Group, add a rule to allow HTTP and HTTPS requests. Review and Launch Instance in Step 7.
I highly recommend you to associate Elastic IP address at this point. Now, wait everything will be done for you. It will take a couple of minutes to run the whole script. Wait until the instance status check is green.

Now check your first WordPress installation page. Type static public IP address associated with the instance in the browser. If you see WordPress language select page then it can be confirmed that the process was completed successfully. Configure WordPress and make sure you can update Plugins and themes (to confirm files and folder permission).
Download Script :
Click here for AWS Ubuntu Server 20.04 LTS
Click here to see how to use Terraform to automate WordPress installation
Shell script for AWS Linux 2
#!/bin/bash
# AUTOMATIC WORDPRESS INSTALLER IN  AWS LINUX 2 AMI


#Change these values and keep in safe place
db_root_password=PassWord4-root
db_username=wordpress_user
db_user_password=PassWord4-user
db_name=wordpress_db

# install LAMP Server
yum update -y
#install apache server
yum install -y httpd

#since amazon ami 2018 is no longer supported ,to install latest php and mysql we have to do some tricks.
#first enable php7.xx from  amazon-linux-extra and install it

amazon-linux-extras enable php7.4
yum clean metadata
yum install -y php php-{pear,cgi,common,curl,mbstring,gd,mysqlnd,gettext,bcmath,json,xml,fpm,intl,zip,imap,devel}
#install imagick extension
yum -y install gcc ImageMagick ImageMagick-devel ImageMagick-perl
pecl install imagick
chmod 755 /usr/lib64/php/modules/imagick.so
cat <<EOF >>/etc/php.d/20-imagick.ini

extension=imagick

EOF

systemctl restart php-fpm.service

#and download mysql package to yum  and install mysql server from yum
yum install -y https://dl.fedoraproject.org/pub/epel/epel-release-latest-7.noarch.rpm
yum localinstall -y https://dev.mysql.com/get/mysql57-community-release-el7-11.noarch.rpm
yum install -y mysql-community-server


systemctl start  httpd
systemctl start mysqld

# Change OWNER and permission of directory /var/www
usermod -a -G apache ec2-user
chown -R ec2-user:apache /var/www
find /var/www -type d -exec chmod 2775 {} \;
find /var/www -type f -exec chmod 0664 {} \;

# Download wordpress package and extract
wget https://wordpress.org/latest.tar.gz
tar -xzf latest.tar.gz
cp -r wordpress/* /var/www/html/

# AUTOMATIC mysql_secure_installation
# change permission of error log file to extract initial root password
chown  ec2-user:apache /var/log/mysqld.log
temppassword=$(grep 'temporary password' /var/log/mysqld.log | grep -o ".\{12\}$")
chown  mysql:mysql /var/log/mysqld.log

#change root password to db_root_password
 mysql -p$temppassword --connect-expired-password  -e "SET PASSWORD FOR root@localhost = PASSWORD('$db_root_password');FLUSH PRIVILEGES;"
mysql -p'$db_root_password'  -e "DELETE FROM mysql.user WHERE User='';"
mysql -p'$db_root_password' -e "DELETE FROM mysql.user WHERE User='root' AND Host NOT IN ('localhost', '127.0.0.1', '::1');"


# Create database user and grant privileges
mysql -u root -p"$db_root_password" -e "GRANT ALL PRIVILEGES ON *.* TO '$db_username'@'localhost' IDENTIFIED BY '$db_user_password';FLUSH PRIVILEGES;"

# Create database
mysql -u $db_username -p"$db_user_password" -e "CREATE DATABASE $db_name;"

# Create wordpress configuration file and update database value
cd /var/www/html
cp wp-config-sample.php wp-config.php

sed -i "s/database_name_here/$db_name/g" wp-config.php
sed -i "s/username_here/$db_username/g" wp-config.php
sed -i "s/password_here/$db_user_password/g" wp-config.php
cat <<EOF >>/var/www/html/wp-config.php

define( 'FS_METHOD', 'direct' );
define('WP_MEMORY_LIMIT', '256M');
EOF

# Change permission of /var/www/html/
chown -R ec2-user:apache /var/www/html
chmod -R 774 /var/www/html

#  enable .htaccess files in Apache config using sed command
sed -i '/<Directory "\/var\/www\/html">/,/<\/Directory>/ s/AllowOverride None/AllowOverride all/' /etc/httpd/conf/httpd.conf

#Make apache and mysql to autostart and restart apache
systemctl enable  httpd.service
systemctl enable mysqld.service
systemctl restart httpd.service
Shell script for AWS Ubuntu 20.04 LTS
#!/bin/bash
# AUTOMATIC WORDPRESS INSTALLER IN  AWS Ubuntu Server 20.04 LTS (HVM)
# CHANGE DATABASE VALUES BELOW AND PASTE IT TO USERDATA SECTION In ADVANCED SECTION WHILE LAUNCHING EC2
# USE ELASTIC IP ADDRESS AND ALLOW SSH, HTTP AND HTTPS REQUEST IN SECURITY GROUP
# by Dev Bhusal
# Downloaded from https://www.devbhusal.com/wordpress.awsubuntu.sh

#Change these values and keep in safe place
db_root_password=PassWord4-root
db_username=wordpress_user
db_user_password=PassWord4-user
db_name=wordpress_db

# install LAMP Server
apt update  -y
apt upgrade -y
#install apache server
apt install -y apache2


apt install -y php
apt install -y php php-{pear,cgi,common,curl,mbstring,gd,mysqlnd,bcmath,json,xml,intl,zip,imap,imagick}


#and download mysql package to yum  and install mysql server from yum
apt install -y mysql-server mysql-common


# starting apache and mysql server and register them to startup

systemctl enable --now  apache2
systemctl enable --now mysql

# Change OWNER and permission of directory /var/www
usermod -a -G www-data ubuntu
chown -R ubuntu:www-data /var/www
find /var/www -type d -exec chmod 2775 {} \;
find /var/www -type f -exec chmod 0664 {} \;


# Download wordpress package and extract
wget https://wordpress.org/latest.tar.gz
tar -xzf latest.tar.gz
cp -r wordpress/* /var/www/html/


# AUTOMATIC mysql_secure_installation
#stopping mysql and starting with safe mode
systemctl stop mysql
mkdir /var/run/mysqld
chown mysql:mysql /var/run/mysqld
mysqld_safe --skip-grant-tables >res 2>&1 &


#change root password to db_root_password

mysql -uroot -e "UPDATE mysql.user SET authentication_string=null WHERE User='root';"
mysql -uroot -e " UPDATE mysql.user SET plugin='mysql_native_password'  WHERE User='root';flush privileges"

killall -v mysqld

systemctl stop mysql
systemctl start mysql


mysql -uroot -e "ALTER USER 'root'@'localhost' IDENTIFIED WITH mysql_native_password BY '$db_root_password';FLUSH PRIVILEGES;"
mysql -uroot -p$db_root_password  -e "DELETE FROM mysql.user WHERE User='';"
mysql -uroot -p$db_root_password -e "DELETE FROM mysql.user WHERE User='root' AND Host NOT IN ('localhost', '127.0.0.1', '::1');"


# Create database user and grant privileges
mysql -uroot -p$db_root_password -e "CREATE USER '$db_username'@'localhost' IDENTIFIED BY '$db_user_password';"
mysql -uroot -p$db_root_password -e "GRANT ALL ON *.* TO '$db_username'@'localhost';flush privileges;"
# Create database
mysql -uroot -p$db_root_password -e "CREATE DATABASE $db_name;"

# Create wordpress configuration file and update database value
cd /var/www/html
cp wp-config-sample.php wp-config.php

sed -i "s/database_name_here/$db_name/g" wp-config.php
sed -i "s/username_here/$db_username/g" wp-config.php
sed -i "s/password_here/$db_user_password/g" wp-config.php
cat <<EOF >>/var/www/html/wp-config.php

define( 'FS_METHOD', 'direct' );
define('WP_MEMORY_LIMIT', '256M');

EOF

# Change permission of /var/www/html/
chown -R ubuntu:www-data /var/www/html
chmod -R 774 /var/www/html
rm /var/www/html/index.html
#  enable .htaccess files in Apache config using sed command
sed -i '/<Directory "\/var\/www\/html">/,/<\/Directory>/ s/AllowOverride None/AllowOverride all/' /etc/apache2/apache2.conf

# restart apache

systemctl restart apache2
If you face any problem please comment below.
Very good, works!!
Would know how to do the same process but with a Ubuntu AMI and Apache2?
Im trying but keep getting a database connection error
Sorry for late delay, database connection error must be due to mysql configuration. Mysql installation varies from MYSQL version and OS . I will have a look and try to get back to you
Please download userdata for ubuntu from this link
https://www.devbhusal.com/wordpress.awsubuntu.sh
thank you for this
from my understanding it seems this script is design for when having your MySQL database on prem with your web server, what if your database instance is separate
I mean if your database is not locally hosted
thank you
Hi Richard, thank you for your comment. If your database in not hosted in same server and hosted somewhere else ,lets say RDS, you can skip mysql server installation part and login to RDS rather than localhost. It is actually just 2 or 3 lines of edit . If time permits, I will make another post to show how to connect to RDS server.
thank you
Thank you for the quick reply,.. that 3 lines of code is what I ve been searching everywhere for. Am using terraform to provision the whole infrastructure and am having problem scripting the WordPress code in userdata of the WebServer instances to automatically connect and install in the RDS instance,.. I hope you understand my problem
Again I truly appreciate your reply.
Hi Richard make sure you have you have configured security group of ec2 with
correct inbound rules:
MYSQL/Aurora TCP 3306 Allow
and security group of RDS to allow security group of ec2 .
I am afraid you have to configure your root/master/admin user of RDS using terraform .
and you can either create WordPress user, database and passwords using either terraform or USERDATA
if you want to configure using USERDATA then edit user data with following setting
Grab RDS endpoint and start edit your script:
connect to root using :
mysql -h yourRDS.rdsjvbdkjk.ap-southeast-2.rds.amazonaws.com:3306 -P 3306 -u admin -p$db_root_password
Scripts are almost same, just add mysql -h yourRDS.rdsjvbdkjk.ap-southeast-2.rds.amazonaws.com:3306 -P 3306 in front of mysql commands.
add this line to wp-config.php and dont forget port number 3306 ..
define( ‘DB_HOST’, ‘yourRDS.rdsjvbdkjk.ap-southeast-2.rds.amazonaws.com:3306’ );
If you are still not able to connect I will send you full script.
Hi Dev
Thank tou so much for all your help. Yes I I have ensured the security groups allows the proper port. I was able to ssh into the webserver instance and then connect to my database using my username password and “endpoint” I copied from my datase from the AWS console.
The only issue is am trying to use terraform to write everything as a code both WebServer and RDS at the same time. And there’s no way to reference the endpoint since it’s just being created,.. I even try using the name I give the database as the host name but obviously won’t work.
I ve searched everywhere on the net to see how this can be fully automated,.. no luck ,.. yet,..If you find a way this can be done it ll be awesome
Thank you again man.
Hi Richard,
Finally got some time off from my job. So I spent my Friday night writing the script as you are looking for.
I have pushed my script to Github. Please have a look. It is working from my side.
I will make a new post about it near soon.
https://github.com/devbhusal/terraform-ec2-RDS-wordpress
Hello Dev,
I am also using your script for an automated WordPress installation on AWS. Thank you so much, it is an excellent one!
It will be very helpful if you can create a new post with TF, RDS specific content. I have some questions like:
– to execute “mysql -h RDS_URL” which mysql package should be installed on the instance?
– how to pass RDS creds to the script with TF, so sed replacements will work…etc
Thank you in advance
Please follow my github repo
https://github.com/devbhusal/terraform-ec2-RDS-wordpress
Hope this helps you
https://www.devbhusal.com/using-terraform-to-automate-wordpress-installation-with-aws-ec2-instance-and-rds/
Im trying but keep getting a database connection error on your new script too
Hi Dev.
Can you please add the required commands to install CPanel to the AWS Ubuntu Instance using User Data?
Thank you